|
Trip 35 Gregory J Smith, Western Australia, April 1999 Over the years I had heard snippets of praise for the classic Olympus Trip 35 compact camera. Having decided to start photography again, I thought that a compact camera would help me catch some pictures I wouldn't otherwise get. The requirements were small, easy to use, some degree of manual override and sharp lens. The Trip seemed to fit the bill. So after researching the topic on the web, I started looking around. Here's the story.... Becoming a Tripper Every hobby and profession seems to have it's legends, and in photography the Olympus Trip 35 compact camera is one of them. With a design now over 30 years old, the camera is still used by thousands worldwide and continues to have a reputation for solid engineering and good results. Buying it. So, having decided to "take the plunge" I started digging through the Perth second hand shops for a reasonable specimen. The first I came across (for $45) seemed in mint condition, but the whole lens assembly was loose. Also, I wasn't sure if the internal light meter was working or not. The second camera I saw (at the princely sum of AUS$29 - about US$19) was not in such good condition. The focus and film speed rings were very loose but the lens itself was solid. Also the lightmeter definitely worked. I tested it in the shop by setting the ASA to 25 and pointing the camera indoors and observed the red flag coming up in the view finder. Next, when the button was pressed and held down in varying light conditions I could see the aperture more open in the dark, and more closed under light. Obviously not an exact test but reason enough to suspect the system was in some kind of working order. The lens also had a UV0 filter on it - hopefully indicating that previous owner had used it to protect the lens itself. This second camera became my first Trip 35! Now I was excited and I couldn't wait to get it home (one day I will get a "real" life). Before testing the camera with a film, I thought I might try to fix the loose focus and film speed rings. On the bench and in a thousand bits At first I couldn't see anyway to take the lens assembly apart, so I started with the top, bottom and front covers, hoping to find some clue. The inner workings of the famous Trip were revealed! This is how the automatic exposure works:
On this camera, the needle movement was smooth and response was quite swift - which is pretty good news. There is a resistor in series with the meter movement, but otherwise I couldn't see any easy lightmeter calibration adjustment. Anyway, exposure accuracy was not my immediate concern. 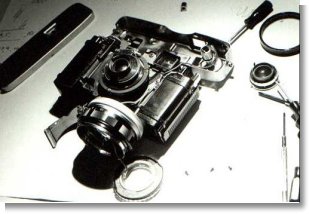 Looking at the lens in more detail, I found three small grub screws on the side of the front lens ring (the one inside the lightmeter circle). Loosening these allows the ring to be removed and then the front lens unscrews and can be taken off. Underneath there are two screws which hold the lightmeter circle in place (these don't need to come out) and three other screws which hold the film speed, focus and aperture rings in place. I untangled the wires leading to the light cell from the bottom of the camera body (to give them a bit of slack), undid the three screws and was able to remove the focus and aperture rings. There is a small ball bearing between the aperture and focus rings that provides the ring "clicks". Be careful - it drops out easily and is very easy to lose! Looking at the lens in more detail, I found three small grub screws on the side of the front lens ring (the one inside the lightmeter circle). Loosening these allows the ring to be removed and then the front lens unscrews and can be taken off. Underneath there are two screws which hold the lightmeter circle in place (these don't need to come out) and three other screws which hold the film speed, focus and aperture rings in place. I untangled the wires leading to the light cell from the bottom of the camera body (to give them a bit of slack), undid the three screws and was able to remove the focus and aperture rings. There is a small ball bearing between the aperture and focus rings that provides the ring "clicks". Be careful - it drops out easily and is very easy to lose!Now I could see three flat topped brass screws that hold the focus and flim speed rings together. These were well worn but a small amount of tightening resulted in almost "as new" tightness. Perfect! Now to get everything back together. Fortunately, the Japanese provided locating lugs for most of the bits so assembly was pretty straightforward. I had to assemble everything by hand and hold it tight while replacing the three mounting screws - otherwise that little ball bearing kept on dropping out. 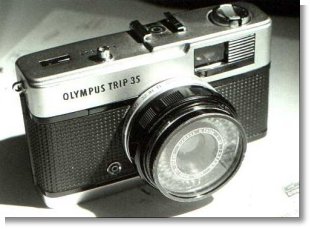 The final step was to screw the front lens into place. Unfortunately there didn't seem to be any locating lug or positioning aid. So how would I be able to calibrate the focus? Big problem. The final step was to screw the front lens into place. Unfortunately there didn't seem to be any locating lug or positioning aid. So how would I be able to calibrate the focus? Big problem.My solution was to jam the shutter open with a match, and tape a piece of frosted plastic from a negative storage sleeve on the film plane. I then set the camera up at 1.5 metres from my bench and used a magnifying glass to look at the image on the plastic (pinhole camera style) whilst adjusting the front lens for the best focus I could get. With the focus set for 1.5m, I then replaced the front lens ring and tightened the grub screws. (There seemed to be a vertical scratch on the front lens holder that could be an alignment mark but I couldn't see anything to align it with. I would appreciate feedback from anybody who might know a better way to reassemble the lens with the correct focus setting.) Back together - but does it work? Now all I had to do was put in a film and run some test shots. I loaded up a roll of HP5 (I tend to do quite a bit of low light stuff so 400ASA is about the slowest I go these days) and took some happy snaps. I also did some test shots to see if the focus and sharpness was right, and other shots to try and get an idea if the automatic exposure was reasonable. For the focus tests I generated 10 test pages on my computer that were designed to test the focus at 1.0, 1.5 and 3.0m. At 1.5m distance for instance, I ran a test shot with the focus set at 1.0, 1.5, 3.0 and infinity to see which gave the sharpest result. For these shots, I adjusted the light level to make sure the aperture was wide open. 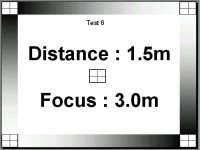 The results The test shots showed that the focus setting procedure I used had worked. At a distance of 1.5m, the picture was sharpest with the focus set to 1.5m. It was noticeably less sharp for 1.0, 3.0 and infinity settings. Other distances produced the same result. Outdoor shots also showed that the focus and sharpness was nearly as good as the film grain itself - producing very acceptable results when enlarged to 11 x 14 in. A few things are worthwhile remembering:
So now I'm a happy Tripper. The meagre investment in cash and few hours of my time has resulted in a great little camera. Why is this important to me? Well I'll still be using my SLR and more modern kit for planned pictures, but often you see an image that's just worth catching right now. The Trip is perfect - compact size, good sharpness and some manual override capability. I've already started looking around for another so that I can load up each with different films. If anyone wants any more detail about what I did, please feel free to e-mail me at gregsmith@smithonline.id.au, and check out these pages for some of my Trip pics. Update - April 2003 In the last year or so (2002/3) I've had some feedback and questions about my repair of the Trip35. In general people wanted to know a better way to reset the focus after disassembly. Well, as suggested by more than one e-mailer, the best way is to carefully mark the components *before* taking them apart. So at least you can get back to the original settings. Rineke Groothengel of the Netherlands had access to more sophisticated equipment to get an exact result. He wrote in March 2003:
Thanks Rineke! I'm always happy to try and answer other questions, but please remember that my story was originally written in April 1999 and my memory ain't that good. So forgive me if I can't help.
|
|
Created by Greg Smith -
Hosted on vps2.smithonline.id.au (Amazon Lightsail) on Centos -
Server by Apache -
CMS by CMSimple.dk -
Template by
Websitetemplate.org
![]()